

Table of contents
Mounting partitions with Logical Volume Manager: LVM2
Purpose
The aim of this quick topic is to see how we can manage our partition using logical volume 2 on a ubuntu bionic virtual machine.
System configuration: VM Info:
- Hypervisor: VirtualBox
- Ubuntu 14.04
- user: root
- hostname:
my-bionic - Ubuntu LVM documentation
Note: This topic is more focus on how to use lvm rather than how lvm works Keep in mind that sys admin system manipulations require a good understanding of concepts you are dealing with. If you want to know more about LVM please refer to the documentation
Quick overview
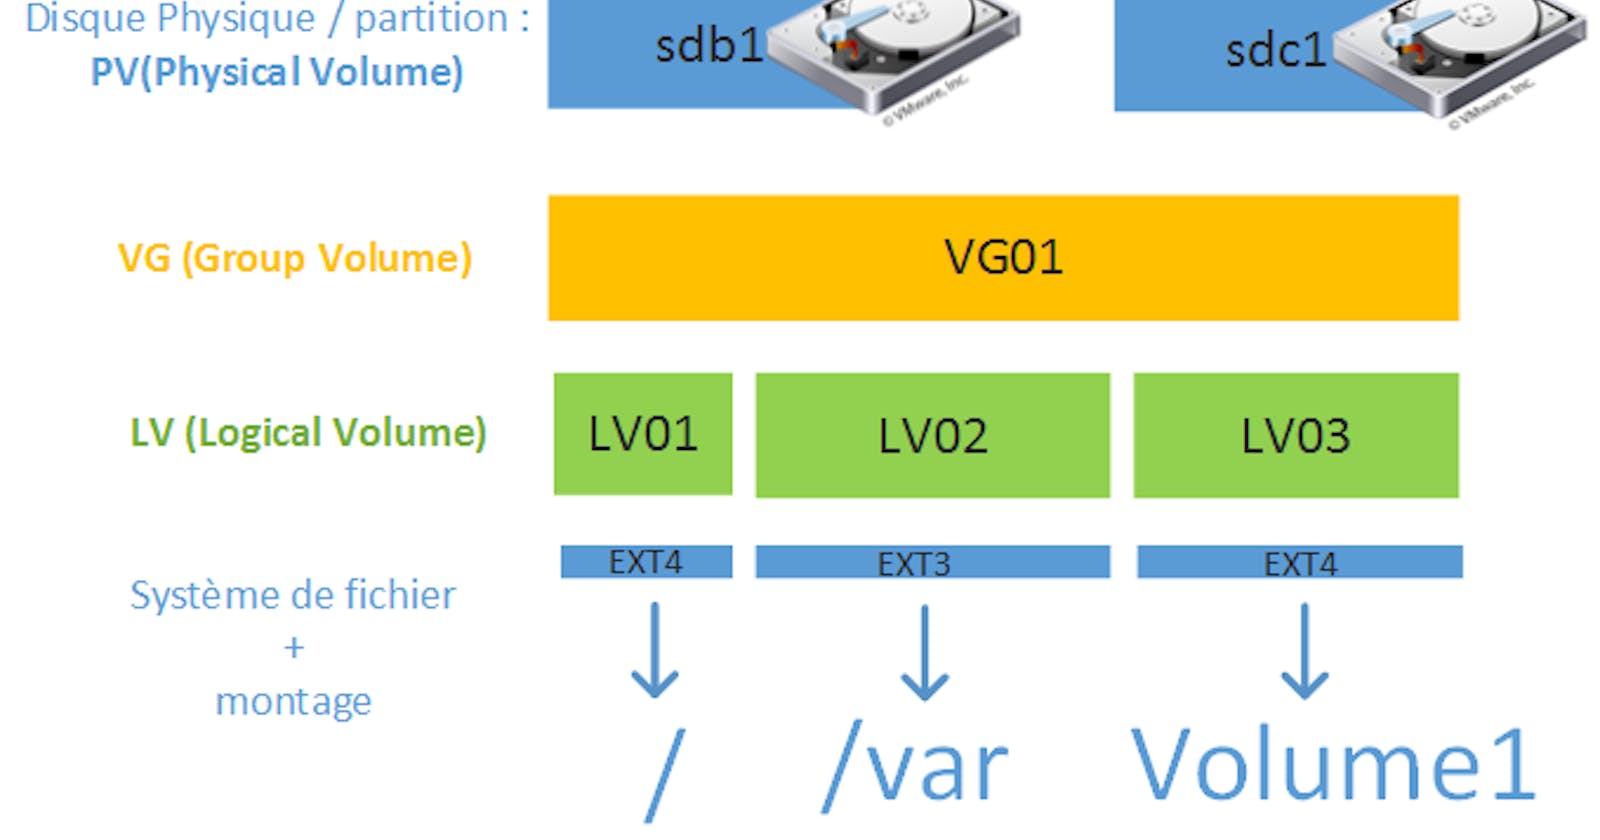
lvm purpose is to give the user a partition managment of physical driver using a logical layer. It basically consists of three steps:
- Set Physical Volume.
- Gathering Physical Volume into a Volume Group.
- Split Volume Group into Logical Volume.
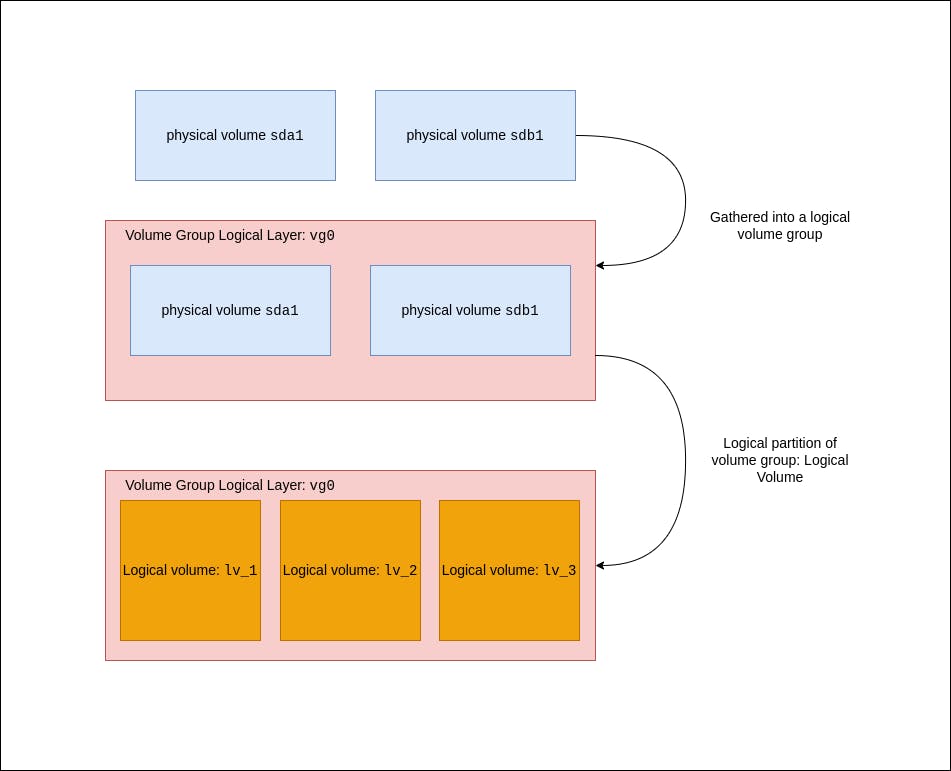
Diagram
The diagram below, shows an overview of the process:
Use case
In this case I have a main partition sda mount on / , and I add a second 2GB disk sdb through the Virtual Box interface.
Note: Even if everything is virtually generated with VBox, what matters here is the OS point of view.
Here we are going to:
- Associate
sdbto a Physical Volume - Create a Volume Group
- Create Logical Volume
- Mount the Logical Volume
- Resize the Logical Volume
Physical Volume set up
Let's see what do we have at the beginning:
lvmdiskscan
Output:
    /dev/sda1 [       9,00 GiB]
    /dev/sda5 [    1022,00 MiB]
    /dev/sdb  [       2,00 GiB]
    1 disk
    2 partitions
    0 LVM physical volume whole disks
    0 LVM physical volumes
We create a physical volume associated to sdb
pvcreate /dev/sdb
Output:
Physical volume "/dev/sdb" successfully created
Volume Group creation
By now, our physical volume has been created, let's create a volume group from it:
vgcreate vg_test /dev/sdb
Output:
Volume group "vg_test" successfully created
Below some features that could be useful:
- Size the volume when create it:
$ vgcreate -s 8M vg_test /dev/sdb - Add physical disk to an existing volume:
$ vgextend vg_test /dev/sdc
Create a Logical Volume from this Volume Group
As it is display in the diagram we are going to split the Volume group into Logical Volume. Let's start with a 1GB logical partition
lvcreate -L 1G -n lv_test vg_test
-L: size parameter-n: name of the partition
Output:
Logical volume "lv_test" created
Note: Here we will create only one logical volume, but you can set your own partitionning using the command above.
_A useful command, just in case: Create a logical volume from all free space left: $ lvcreate -l 100%FREE -n lv_test_2 vg_test_
-n: name of the LV-l 100%FREE: size to all the volume left
Check
Let's run the same command we ran at the beginning
lvmdiskscan
Output
  /dev/vg_test/lv_test [       1,00 GiB]
  /dev/sda1            [       9,00 GiB]
  /dev/sda5            [    1022,00 MiB]
  /dev/sdb             [       2,00 GiB] LVM physical volume
  1 disk
  2 partitions
  1 LVM physical volume whole disk
  0 LVM physical volumes
Our system configuration has been successfully took into account !
Set our new logical partition
Now that our partition has been created we will format and mount it.
Partition formatting
We will create a new ext4 file system
Note: more information about ext4 here
mkfs.ext4 /dev/vg_test/lv_test
Output:
    File system label =
    Operating System Type: Linux
    Block size = 4096 (log = 2)
    Fragment size = 4096 (log = 2)
    "Stride" = 0 blocks, "Stripe width" = 0 blocks
    65536 i-nodes, 262144 blocks
    13,107 blocks (5.00%) reserved for the super user
    First data block = 0
    Maximum number of filesystem blocks = 268435456
    8 groups of blocks
    32768 blocks per group, 32768 fragments per group
    8192 i-nodes per group
    Emergency superblocks stored on the blocks:
    32768, 98304, 163840, 229376

    Allocation of group tables: completed
    Writing of inode tables: completed
    Creation of the journal (8192 blocks): completed
    Writing the superblocks and accounting information of the system
    files: completed
Mount the volume
Let's mount our new file system on /var/log
mount /dev/vg_test/lv_test /var/log
Check it:
df -h
Output
    Filesystem                   Size  Used Avail Use% Mounted on
    udev                         483M  4,0K  483M   1% /dev
    tmpfs                        100M  860K   99M   1% /run
    /dev/sda1                    8,8G  4,6G  3,8G  56% /
    none                         4,0K     0  4,0K   0% /sys/fs/cgroup
    none                         5,0M     0  5,0M   0% /run/lock
    none                         497M   76K  497M   1% /run/shm
    none                         100M   40K  100M   1% /run/user
    /dev/mapper/vg_test-lv_test  976M  1,3M  908M   1% /var/log
Manipulate the logical volume
One of the assests of lvm over historical way to partition a disk is that it is very easy to manipulate afterwards.
Here we going to resize the FS down to 400MB, first we need to unmount the FS.
Unmount the volume
The path /var/log is a specific one cause it cannot be unmount easily.
Let's try to unmount it
umount /dev/vg_test/lv_test
Output:
umount: /var/log: device is busy.
        (In some cases useful info about processes that use
         the device is found by lsof(8) or fuser(1))
e.g: No way :(
In fact /var/log is a directory where a lot of daemons/applications write their logs, so it is constantly writing.
To unmount it we have to:
- Edit the
fstabfile
vim /etc/fstab
Comment the line dedicated to the lv_test partition (at the end of the file)
    # /etc/fstab: static file system information.
    #
    # Use 'blkid' to print the universally unique identifier for a
    # device; this may be used with UUID= as a more robust way to name devices
    # that works even if disks are added and removed. See fstab(5).
    #
    # <file system> <mount point>   <type>  <options>       <dump>  <pass>
    # / was on /dev/sda1 during installation
    UUID=19d6e63f-0932-407c-8ae4-2c5d086eaa6f /               ext4    errors=remount-ro 0       1
    # swap was on /dev/sda5 during installation
    UUID=55df542f-da15-403a-9a68-b9685b9cd114 none            swap    sw              0       0

    ############ Below the line we have to comment #######
    #/dev/vg_test/lv_test /var/log ext4 nodev,nosuid,noexec 0       2
Then a reboot the machine
reboot
Once the machine is back and you are logged in, check that the file system has been unmount.
df -h
Output
Filesystem      Size  Used Avail Use% Mounted on
udev            483M  4,0K  483M   1% /dev
tmpfs           100M  856K   99M   1% /run
/dev/sda1       8,8G  4,6G  3,8G  56% /
none            4,0K     0  4,0K   0% /sys/fs/cgroup
none            5,0M     0  5,0M   0% /run/lock
none            497M   76K  497M   1% /run/shm
none            100M   28K  100M   1% /run/user
Note: Usually a umount command is enough for this kind of operation, but I found this case interessting and it comes from a true personal story :P
lv_test size modification:
Now the partition has been unmount let's see what do we have:
lvdisplay
Output:
--- Logical volume ---
LV Path                /dev/vg_test/lv_test
LV Name                lv_test
VG Name                vg_test
LV UUID                S69CrW-55YL-gPRi-ddvd-ovEZ-6RRS-tMaHVX
LV Write Access        read/write
LV Creation host, time my-bionic, 2020-02-17 11:02:41 +0100
LV Status              available
# open                 0
LV Size                1,00 GiB
...
Before doing anything we should do a file system integrity check:
e2fsck -ff /dev/vg_test/lv_test
Output:
e2fsck 1.42.9 (4-Feb-2014)
Pass 1: check i-nodes, blocks and sizes
Pass 2: checking the directory structure
Pass 3: verify directory connectivity
Pass 4: check the reference counters
Pass 5: verification of the information in the group summary /dev/vg_test/ lv_test: 27/65536 files (3.7% non-contiguous), 12713/262144 blocks
Once all check are ok, we can manipulate the FS, let's resize it down to 400MB
resize2fs /dev/vg_test/lv_test 400M
Output
resize2fs 1.42.9 (4-Feb-2014)
Resizing filesystem on /dev/vg_test/ lv_test to 409600 (1k) blocks. The /dev/vg_test/ lv_test filesystem is now 409600 blocks in size.
Note: Here we resized the file system but the logical volume is still 1GB sized.
Now our file system is sized to 400MB as we want, we can decrease the logical volume:
lvreduce --size 400M /dev/vg_test/lv_test
Output (note the warning !):
    WARNING: Reducing active logical volume to 400,00 MiB
    THIS MAY DESTROY YOUR DATA (filesystem etc.)

Do you really want to reduce lv_test? [y/n]: y
    Reducing logical volume lv_test to 400,00 MiB
    Logical volume lv_test successfully resized
The logical volume is now sized to 400MB, we can mount again the FS.
mount /dev/vg_test/lv_test /var/log/ -t auto
Let's have a final check on our file system usage:
df -H
Output:
Filesystem                   Size  Used Avail Use% Mounted on
udev                         506M  4,1k  506M   1% /dev
tmpfs                        105M  877k  104M   1% /run
/dev/sda1                    9,4G  4,9G  4,0G  56% /
none                         4,1k     0  4,1k   0% /sys/fs/cgroup
none                         5,3M     0  5,3M   0% /run/lock
none                         521M   78k  521M   1% /run/shm
none                         105M   29k  105M   1% /run/user
/dev/mapper/vg_test-lv_test  500M  2,4M  467M   1% /var/log
And here we are !
Now you have an overview on how use lvm to manipulate partitions, how create file system and mount them.
Tank you a lot for reading this post, see you soon !